— How to bid on the NFTs —
To purchase and store your NFTs you will need an Ethereum crypto wallet.
Below explains how to download and install the MetaMask wallet & how to fund your wallet with ETH using a coinbase account.
STEP 1: Add the MetaMask extension to Chrome Web Browser Visit Chrome Web Store and search MetaMask to add the extension to your browser. Click on the ”add to Chrome” button.
STEP 1.1: After you’ve added the MetaMask extension to your browser, click on the ”get started” button to start setting up your wallet.

STEP 2: Click on the ”create a wallet” button.
To create your first MetaMask wallet, click on the ”create a wallet” button. If you have another wallet, you can import it into MetaMask too.

STEP 3: Agree or disagree to anonymized data collection
MetaMask wants to collect some anonymized data to improve the wallet. You can agree to it or click on the ”no thanks” button depending on your preference.
STEP 4: Choose a password for your MetaMask wallet
In this step, you should choose a secure password for your MetaMask account. This is not your private key or seed phrase. You will use this password to log in to your MetaMask wallet. If you forget the password, you can import your wallet using the seed phrase that will be shown in the next step.

STEP 5: Back up your seed phrase
Reveal your secret words (backup phrase) and write it down on a piece of paper. You can also store your backup phrase in a USB flash drive, preferably after encrypting it. The security of your backup phrase must be of the utmost importance. Anyone who has access to your backup phrase can transfer your coins to different wallets.

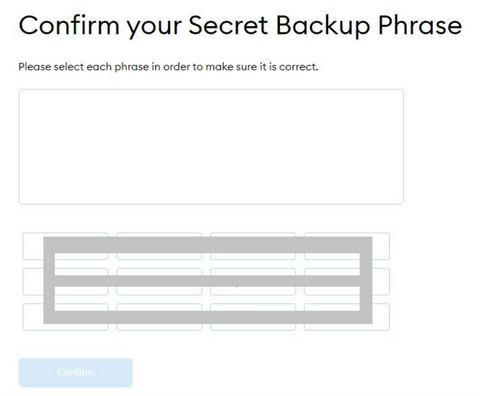
STEP 6: Confirm your seed phrase
After revealing and saving your backup phrase, you need to enter it in order to confirm your backup phrase.
STEP 7: All Done
After confirming your backup phrase, you’re all done!
Read the tips on safety and click on the ”all done” start button using your MetaMask wallet.
STEP 8: Connect your MetaMask wallet to OpenSea
Go to opensea.io, head to the top right profile icon, select "Profile". Click the button on OpenSea to connect your wallet to the platform. Tick the boxes to accept OpenSea terms of service and click the ”proceed” button.

You will then be prompted to connect your wallet. You will continue through multiple prompts, finishing with the connection screen. When you see "Connecting..." OpenSea to your wallet, you're almost done.
Your account will default to "Unnamed", showing only your wallet address below. To personalize your account, select the gear icon on the right side of the screen. You will receive an extra security prompt, select "Sign" and you can begin updating your profile.
STEP 9: Add Funds To Your MetaMask account
The only way to be able to bid for NFTs on OpenSea is to have funds (usually ETH) available in your MetaMask wallet.
Go to your coinbase account here
On the top right corner go to portfolios. Then on the top right corner click on the WITHDRAW button. Select ETH. 
You will then have the option to withdraw your ETH to a crypto address or to your coinbase account. Please select crypto address.

There, you will need to enter the MetaMask wallet address that you have just created:

To find the MetaMask wallet address, click on the google chrome MetaMask extension, and then click on the account name, it will copy directly the wallet address. On the picture below, you would need to click on “Account 1” to copy the wallet address:

You can then paste this wallet address in coinbase and put it where it is written “Enter ETH address”.
WARNING: if you plan to make big transfer of money, we recommend that you make an attempt with a small number of ETH (like 0.001 or so) for the first transfer to make sure that you have copied the right address and that everything works well.
Once you see the ETH appear on your Metamask account, Congratulations, you will be ready to bid on OpenSea!
STEP 11: Buying non-fungible tokens on Opensea
STEP 11.1: find your NFT:
After connecting your wallet to Opensea, go to https://opensea.io/collection/crypto-sweatshirts and then to the NFT you want to buy. Depending on if the NFT is in an ongoing auction, on sale or not currently on sale you will have different options. For the AMBER Crypto Sweatshirts Collection, the NFTs will be sold on a 72 hours auction, you should see something like this:

Click on Make offer.
STEP 11.2: convert your ETH to WETH
There, you will need to convert your ETH to WETH (1WETH = 1 WETH, and once you have WETH you can convert them back to ETH, it’s just needed to make offers). So click on “Convert ETH”.

Then select the amount of ETH that you would like to wrap, i.e. convert into WETH, and click wrap.

Then the Metamask window will appear and you will need to click on confirm. Please note that you will need to pay gas fees for this. Note also that the first time you upgrade your ETH, you’ll need to make two transactions (one to approve OpenSea’s use of WETH). You’ll only need to do that second transaction the first time you upgrade! Hence the double amount of gas fees to be paid the first time.
Once you’ve converted some WETH, you’re off to the races! You can now place as many offers (each one up to your amount of WETH) without paying a dime (gwei).
STEP 11.3: Make the bid
After confirming those transactions, we’ll make an offer! Type in the offer amount (and optionally set an expiration for your offer), and hit “Confirm Offer”

Hit “Sign” and your bid is posted!
STEP 11.4: Add your email to get notified when your bid is accepted
WARNING: if you win one of the crypto sweatshirts, you will receive as part of the NFT an “unlockable content” that only you can see with a secret code that you will need to send to us at contact@projekt002.com with your home address so we can send to you the physical sweatshirts + owner card + limited edition perfume.